Extra Large Pegboard: Easy Craft Room Organization Ideas
An extra large pegboard is your craft room’s new best friend! Are you tired of rummaging through cluttered drawers, piles of fabric scraps taking over your table, or that constant hunt for your favorite paint brush? I know I was! My craft space used to feel like a black hole for supplies. But transforming it with a generously sized pegboard has completely changed the game. Imagine a beautifully organized wall, everything visible and within easy reach – your threads neatly spooled, your tools hanging ready, and your inspiration board front and center. For under $100 and a weekend’s work, you can achieve this dream. In this article, I’ll walk you through exactly how to choose the perfect extra large pegboard, install it like a pro, and fill it with clever storage solutions that will make your creative process smoother and more enjoyable than ever before.
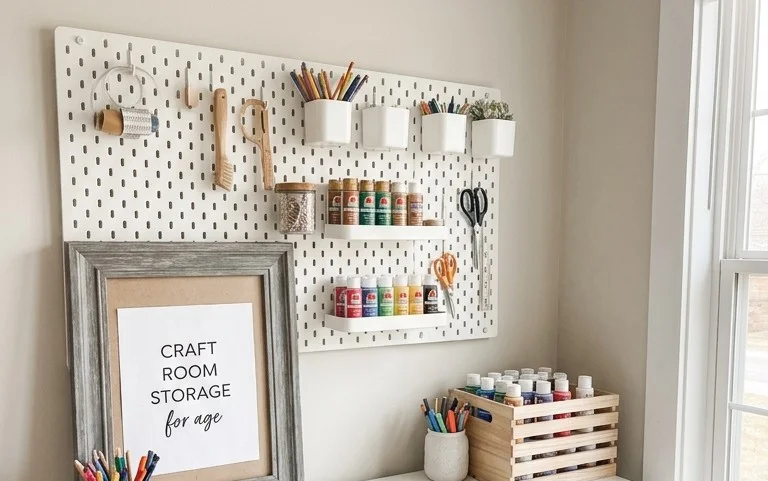
Transform Your Craft Space with an Extra-Large Pegboard
As a fellow craft enthusiast, I know the struggle is real. That beautiful, overflowing collection of paints, threads, stamps, tools, and half-finished projects – it’s a testament to our passion, but it can quickly descend into chaos. For years, I battled overflowing drawers and cluttered shelves, a constant hunt for that one specific embellishment or tool. Then, I discovered the magic of the extra-large pegboard, and my craft room, once a source of frustration, became a zone of inspiration and effortless organization. If you’re dreaming of a functional and beautiful craft space, an extra-large pegboard might just be the game-changer you need.
Why an Extra-Large Pegboard?
The “extra-large” is key here. While smaller pegboards are great for specific tool walls, an expansive one can become the entire visual and functional hub of your craft room. Think of it as your vertical command center. It maximizes wall space, keeps essentials within easy reach, and can be surprisingly beautiful when styled correctly. It’s not just about hiding clutter; it’s about celebrating your craft and making the process more enjoyable.
What You’ll Need and a Rough Cost Estimate
Let’s get down to the nitty-gritty. You’ll be looking for a substantial piece of pegboard. For an “extra-large” setup, I recommend a piece measuring at least 4 feet by 8 feet. These are standard sizes and are readily available at most home improvement stores.
Here’s a breakdown of what you’ll need and a general idea of the cost:
- Pegboard: One 4ft x 8ft sheet of 1/4-inch thick pegboard. This is usually the most affordable option. Expect to pay around $30-$50.
- Mounting Hardware: You’ll need a way to attach it to the wall. For a solid wall, heavy-duty screws (at least 2-inch) and wall anchors (if you’re not drilling into studs) are essential. I usually opt for 12-16 screws and corresponding anchors. Budget around $10-$20 for these.
- Pegboard Hooks and Accessories: This is where you can really customize. You’ll want a variety of hooks, shelves, bins, and holders. A good starter pack with a mix of 20-30 pieces can cost anywhere from $40-$80. As you use it, you’ll likely buy more specific items, so factor in ongoing costs.
- Optional: Framing/Edge Banding: To give it a more finished look, you might want some thin wood strips (like 1×2 pine) and wood glue or small finishing nails. This adds about $20-$30.
- Optional: Paint/Stain: If you want to match your decor, some spray paint or wood stain will cost around $10-$20.
So, for a robust, do-it-yourself extra-large pegboard setup, you’re looking at an initial investment of roughly $110-$170. This is a fraction of what a custom-built organizer would cost, and the flexibility is unmatched.
Measuring and Planning: The Crucial First Step
Before you even think about picking up a drill, grab your tape measure and a notepad. This is where good planning prevents future headaches.
- Wall Space Assessment: Identify the wall in your craft room that offers the most uninterrupted space. Measure the width and height of the available area. Remember to account for any windows, doors, or existing furniture that might interfere.
- Pegboard Placement: Decide where the pegboard will go. Will it be above a workbench? Alongside a cutting table? Consider the height. You want the majority of your commonly used items to be at eye level or within comfortable reach. A good rule of thumb is to mount the bottom edge about 4-6 inches above your workspace.
- Tool and Supply Inventory: This is the fun part! Go through your craft supplies. What do you use most frequently? What do you want to see displayed? What needs to be safely stored? Group similar items together. This will inform the types and quantities of hooks and accessories you’ll need. For example, if you have a lot of paintbrushes, you’ll want to dedicate a section to brush holders. If you have spools of thread, a thread organizer is a must.
- Layout Sketch: On your notepad, sketch out your wall space. Draw a rectangle representing the pegboard and then start mentally (or physically with small cutouts of your supplies!) placing your items. Think about flow. Keep frequently used items in prime real estate. Less used or bulkier items can go higher or lower.
The Step-by-Step Installation Process
Now, let’s get building! This is surprisingly straightforward.
- Prepare the Pegboard (Optional): If you’re painting or staining your pegboard, do this now. Lay it flat in a well-ventilated area and apply your chosen finish. Let it dry completely according to the product instructions. If you’re framing it, measure and cut your wood strips, then attach them to the edges using wood glue and small finishing nails.
- Mark Your Mounting Points: Hold the pegboard against the wall in its intended position. Use a pencil to lightly mark where the mounting holes will go. For a 4ft x 8ft board, I recommend at least 6-8 mounting points along the top and bottom edges, and a couple in the middle for extra stability. Aim for roughly 16-24 inches apart horizontally and vertically.
- Drill Pilot Holes: Using a drill bit slightly smaller than your screws, drill pilot holes at each marked point. If you are drilling into drywall without hitting studs, you’ll need to drill larger holes for your wall anchors.
- Insert Wall Anchors (If Necessary): Gently tap your wall anchors into the pilot holes until they are flush with the wall.
- Attach the Pegboard: Position the pegboard back against the wall, aligning the holes with your drilled holes or anchors. Drive your screws through the pegboard and into the wall or anchors. Tighten them securely, but don’t overtighten, which could strip the holes. Ensure the board is flush against the wall.
- Add Your Hooks and Accessories: Once the pegboard is securely mounted, it’s time for the fun part! Start inserting your hooks, shelves, and bins into the pre-drilled holes. Refer back to your layout sketch and begin organizing.
Adapting for Small Spaces and Rentals
Don’t have a dedicated craft room, or can’t make permanent changes? No problem! An extra-large pegboard can still be your savior.
- Freestanding Unit: Purchase two sets of pegboard feet (available at some hardware stores or online) and attach them to the bottom of your pegboard. This creates a freestanding unit that can be placed anywhere. You can even lean a larger pegboard against a wall without drilling, secured by its own weight and possibly some anti-slip mats.
- Over-the-Door: Some companies sell large pegboard organizers designed to hang over a door. While they might not be a full 4×8, they offer significant vertical storage.
- Command Strips for Light Items: For a rental, if you are only hanging very light items like small jars of beads or bobby pins, you *might* be able to get away with heavy-duty command strips on the back of certain accessories. However, for the main pegboard, this is generally not recommended for stability. Focus on freestanding solutions.
Styling Notes: Making It Look Good
A pegboard doesn’t have to be purely utilitarian. With a little thought, it can be a beautiful focal point.
- Color Palette: My first pegboard was plain brown, which felt a bit drab. Painting it a soft white, a pastel shade, or even a bold accent color can instantly elevate it. Consider matching it to your existing decor.
- Texture: Think beyond just the pegboard itself. The items you hang add texture. Mix in wooden shelves with metal bins, fabric pouches with ceramic containers. This visual variety keeps it from feeling sterile.
- Strategic Placement: Don’t just cram everything on. Curate what you display. Group your most beautiful tools together. Place your current project’s supplies in a prominent, easily accessible spot. Use attractive containers for smaller items. For example, small glass jars for buttons or beads look lovely.
- Symmetry and Balance: While not strictly necessary, try to create some visual balance. If you have a large shelf on one side, balance it with a cluster of smaller items on the other.
- Lighting: Consider adding some small LED strip lights along the top edge. This not only illuminates your workspace but also adds a cozy glow.
Keeping It Tidy After Week One
The initial setup is always the most exciting. The real test is maintaining that organization.
- The “One In, One Out” Rule: When you bring a new craft supply home, make a habit of immediately finding a spot for it on the pegboard. If a spot is full, consider if you can repurpose an existing item or if something needs to be decluttered.
- The Five-Minute Tidy: At the end of each crafting session, spend just five minutes putting things back in their designated spots. This prevents small messes from snowballing.
- Regular Purge: Every few months, do a more thorough review. Are there items you haven’t used in a year? Consider donating or selling them. This frees up valuable pegboard real estate.
- Designated “In Progress” Areas: Have a specific shelf or bin for items related to your current project. This prevents loose bits and pieces from migrating all over your space.
Mistakes That Make This Fail
Even with the best intentions, there are a few pitfalls that can lead to a disorganized pegboard.
- Overcrowding: The temptation to fill every single hole is strong, but it’s a recipe for disaster. Too many items make it hard to find what you need and can look chaotic. Be selective!
- Using the Wrong Hooks: Not all hooks are created equal. Using flimsy hooks for heavy items is a sure way to have them fall. Ensure your hooks are appropriate for the weight and type of item you’re hanging.
- Ignoring Weight Limits: Pegboard, especially thinner varieties, has weight limitations. Don’t overload shelves with heavy jars of beads or large tools. Distribute weight evenly.
- Lack of a System: If everything is just haphazardly placed, it will quickly become unmanageable. Have a clear system for where things go, and stick to it.
- Forgetting About Accessibility: Putting frequently used items too high or too low makes them inconvenient to access, which can lead to them being left out.
An extra-large pegboard is more than just an organizational tool; it’s an investment in a more enjoyable and productive crafting experience. By taking the time to plan, install carefully, and style thoughtfully, you can transform your craft space into a haven of creativity. Happy organizing!
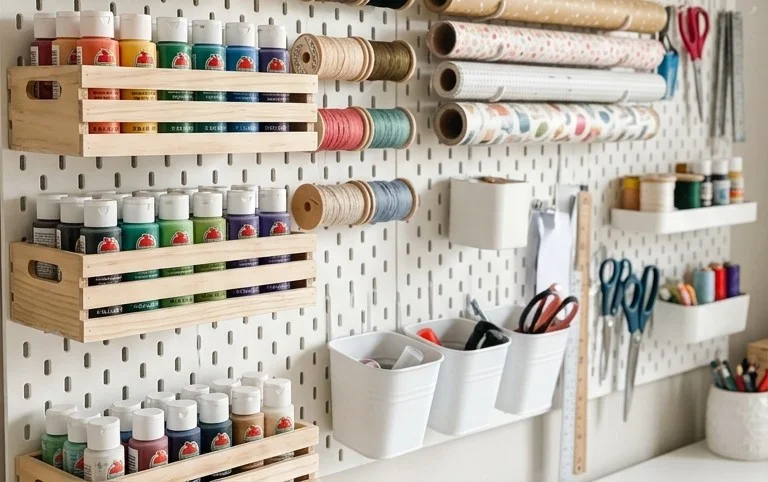
Conclusion
Transforming your craft room with an extra large pegboard is more than just a storage solution; it’s a daily dose of calm and efficiency. Imagine easily finding every tool, every embellishment, and every project component. That’s the magic of a well-organized space. Ready to experience this difference? Start today with the smallest step: clear one small section of your wall and install just a few hooks. For a different vibe or budget, consider a smaller pegboard for a hobby nook or even a magnetic strip in the kitchen for utensils. The possibilities are endless!
We invite you to explore more innovative home decor and organization ideas to make your spaces both beautiful and functional.
