Easy Crochet Cauldron Coaster Ideas: Cozy Decor
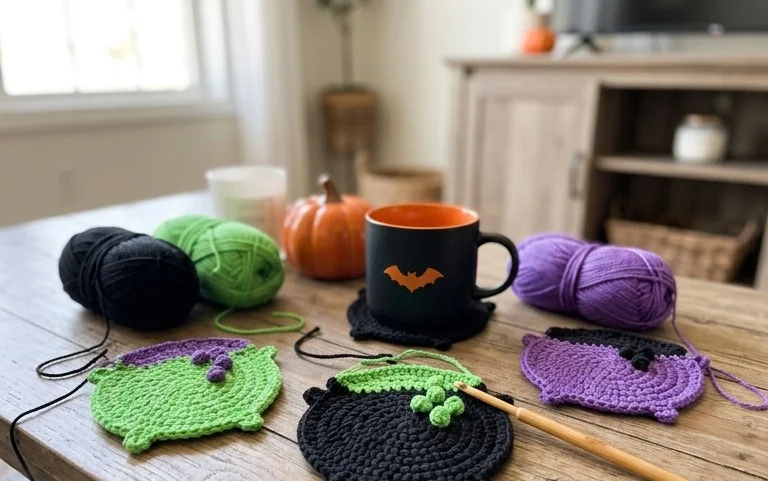
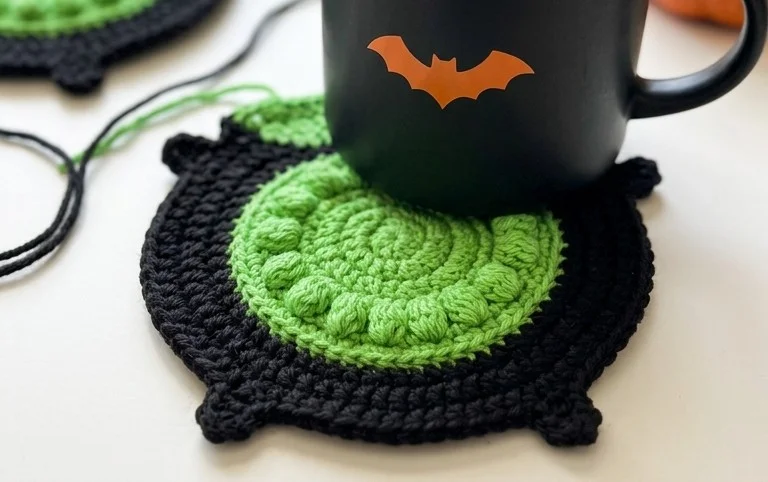
Crochet Cauldron Coasters are the perfect little touch to banish those dreaded drink rings from your beloved furniture! I know I’m not the only one who’s winced as a condensation-laden glass threatened to leave its mark on my coffee table, or worse, my pristine white sideboards. Imagine this: your next cozy cuppa or refreshing evening drink is nestled safely on a charming, mini cauldron that’s as functional as it is adorable. These little wonders, typically costing just a few dollars for materials and taking under an hour to whip up, are a game-changer for any home that appreciates a bit of whimsy and a lot of practicality.
In this article, I’ll guide you through creating your own set of these delightful crochet cauldrons, from choosing the right yarn to perfecting that spooky-cute shape. Get ready to add a touch of magic to your everyday!
Brew Up Some Charm: Crochet Cauldron Coasters for Cozy Decor and Effortless Organization
Let’s be honest, we all love a little bit of magic in our homes, especially when it comes to decor. And if you’re anything like me, you appreciate items that are not only beautiful but also serve a purpose. Enter the crochet cauldron coaster – a delightful and surprisingly practical addition to any living space. These little beauties aren’t just for Halloween; their charming cauldron shape and textured crochet work add a touch of whimsy and warmth all year round. Plus, they’re a fantastic way to protect your surfaces and keep your coffee table looking neat. Today, I’m going to walk you through everything you need to know to bring these adorable coasters into your home, from gathering your supplies to styling them like a pro.
What You’ll Need and Rough Costs
The beauty of crochet projects is their affordability, and these cauldron coasters are no exception. For a set of four coasters, you’ll typically need:
* **Yarn:** Worsted weight acrylic yarn is your best friend here. It’s durable, washable, and comes in a rainbow of colours. For four coasters, you’ll likely need about 100-150 yards (around 90-140 meters) in total. I recommend a dark grey or black for the classic cauldron look, but don’t be afraid to experiment with greens, purples, or even fiery oranges! A typical skein of worsted weight acrylic yarn (around 200 yards or 180 meters) costs between $4 and $7, so you’re looking at roughly $4-$7 for enough yarn for a set.
* **Crochet Hook:** A size H-8 (5mm) crochet hook is usually perfect for this weight of yarn, but you might need to adjust slightly based on your tension. These hooks are readily available for $3-$5.
* **Scissors:** For cutting yarn, of course! You probably already have a pair, but a dedicated pair of craft scissors will cost around $5.
* **Yarn Needle:** For weaving in those pesky ends. A set of basic yarn needles usually costs $3-$5.
So, for your initial investment, you’re looking at roughly $15-$22 to get started, assuming you don’t already have yarn and a hook. That’s a small price to pay for so much decorative and functional charm!
Measuring and Planning Before You Start
Before you dive headfirst into crocheting, a little bit of planning goes a long way. The beauty of a coaster is its simplicity, but understanding its purpose will guide your measurements.
* **Consider Your Drinkware:** What kind of glasses or mugs do you typically use? A standard coffee mug might have a base diameter of around 3-4 inches (7.5-10 cm), while a grape juice glass base can be smaller, maybe 2.5-3 inches (6-7.5 cm). Your coaster should ideally be a little larger than the base of your most common drinkware to catch any condensation or spills effectively.
* **Desired Finished Size:** For a cauldron coaster, I aim for a finished diameter of about 4.5-5 inches (11.5-12.5 cm). This gives a good buffer for most mugs and glasses.
* **Gauge Swatch (Optional but Recommended):** While not strictly necessary for coasters if you’re not aiming for a precise size, doing a small gauge swatch (e.g., a 4×4 inch square using your chosen stitch pattern) can help you understand how your yarn and hook combination will work up. This is especially useful if you’re new to crochet or using a different yarn weight than recommended.
Think about the overall aesthetic you’re going for. Do you want a tight, structured cauldron, or something a bit looser and more organic? This will influence your stitch choices and tension.
The Cauldron Coaster Crochet-Along: A Step-by-Step Guide
Let’s get our hooks ready! This pattern uses basic crochet stitches, making it very beginner-friendly.
1. **Start with the Base:** Begin by creating a magic ring. This creates a tight, closed circle.
2. **Round 1:** Crochet 6 single crochet stitches into the magic ring. Pull the ring tight to close the gap. Join with a slip stitch to the first single crochet. (6 stitches)
3. **Round 2:** Chain 1 (does not count as a stitch). Crochet 2 single crochet stitches into each stitch around. Join with a slip stitch to the first single crochet. (12 stitches)
4. **Round 3:** Chain 1. Crochet 1 single crochet into the first stitch, then 2 single crochet stitches into the next stitch. Repeat this sequence around. Join with a slip stitch. (18 stitches)
5. **Round 4:** Chain 1. Crochet 1 single crochet into the first two stitches, then 2 single crochet stitches into the next stitch. Repeat around. Join with a slip stitch. (24 stitches)
* *Tip:* Continue increasing in this manner for subsequent rounds until your base reaches your desired diameter. For a 4.5-inch base, you might need 5-6 rounds of increases. For example, Round 5: Chain 1. Single crochet in next 3 stitches, 2 single crochet in next stitch. Repeat. Join. (30 stitches)
6. **Forming the “Cauldron” Shape:** Once your base is the size you want, you’ll start working straight rows without increases to build up the sides of the cauldron.
7. **Round (Next Round after Base is Finished):** Chain 1. Single crochet in the back loop only of each stitch around. Join with a slip stitch. This creates a slight upward turn.
8. **Subsequent Rounds:** Chain 1. Single crochet in each stitch around. Join with a slip stitch. Continue making these rounds until the sides of your cauldron reach about 1.5-2 inches (4-5 cm) in height.
9. **Creating the Rim (Optional but Recommended):** For a more defined rim, you can switch to a different stitch or colour for the last 1-2 rounds. For example, you could do a round of half double crochet or a round of slip stitches in a contrasting colour. This adds a nice finishing touch.
10. **Finishing:** Cut your yarn, leaving a tail of about 6 inches (15 cm). Pull the tail through the loop on your hook to secure the stitch. Weave in all loose ends with your yarn needle for a neat finish.
Adapting for Small Spaces and Rentals
The beauty of crochet is its versatility, and these coasters are perfect for renters or those with limited space.
* **No Drilling Required:** Unlike shelves or wall-mounted organizers, crochet coasters are entirely freestanding. They sit directly on your surfaces.
* **Portability:** If you need to clear your coffee table for guests or a game night, these coasters are lightweight and easy to tuck away in a drawer or decorative basket.
* **Protecting Surfaces:** This is their primary function, and they excel at it without any permanent alterations to your furniture. They’re ideal for protecting wood, glass, or laminate surfaces from heat marks and condensation rings.
Styling Notes: Bringing the Magic to Your Decor
Now for the fun part – making your cauldron coasters look amazing in your home!
* **Colour Palette:**
* **Classic Witchy:** Dark greys, blacks, deep purples, and emerald greens are your go-to.
* **Modern Mystical:** Try dusty blues, muted teals, or even a soft blush pink with a contrasting rim.
* **Earthy & Natural:** Ochre, terracotta, and deep browns can create a more grounded, rustic feel.
* **Texture Play:** The inherent texture of crochet is a huge part of its appeal. Mix and match your cauldron coasters with other textures in your space. Think smooth ceramic mugs, rough wooden trays, soft velvet cushions, or sleek metallic accents.
* **What to Put Where:**
* **Coffee Table Centrepiece:** Arrange a set of four coasters in the centre of your coffee table, perhaps with a decorative bowl of potpourri, a small potted plant, or a stack of interesting books.
* **Side Table Companions:** Place individual coasters on side tables next to armchairs or sofas for convenient drink placement.
* **Entryway Statement:** A small dish or tray with a couple of coasters can greet guests in your entryway, offering a place for keys or small items.
* **Bedside Buddy:** Keep one on your bedside table for water or tea.
* **The “In Use” Look:** When drinks are present, the coasters become functional art. The colours of your beverages can complement the coaster hues. A rich, dark coffee against a grey cauldron creates a cozy contrast, while a vibrant herbal tea might pop against a deep purple. Don’t be afraid to have them in use – that’s what they’re for!
Keeping it Tidy After Week One
The beauty of crochet coasters is their low maintenance. After the initial excitement of a week of use, keeping them tidy is a breeze.
* **Daily Wipe Down:** For everyday spills and condensation drips, a quick wipe with a damp cloth is usually all you need.
* **Deeper Cleaning:** Acrylic yarn is generally machine washable. Most coasters can be tossed into a mesh laundry bag and washed on a gentle cycle with cold water. Always air dry them flat to maintain their shape. Avoid high heat in the dryer, as it can warp the acrylic.
* **Dealing with Stains:** For tougher stains, a gentle spot clean with mild soap and water should do the trick. Blot the stain rather than rubbing, which can spread it.
* **Storage:** When not in use, simply stack them neatly on your coffee table, store them in a decorative basket, or tuck them away in a drawer.
Mistakes That Make This Fail
Even the simplest projects can have pitfalls. Here are a few common mistakes that can make your crochet cauldron coasters less than successful:
* **Incorrect Gauge/Tension:** If your stitches are too loose, your coasters might stretch out of shape easily and not effectively contain spills. If they’re too tight, they might be stiff and less visually appealing. Doing a small swatch can help you find your sweet spot.
* **Not Weaving in Ends Properly:** This is the number one cause of unraveling! Always take the time to securely weave in all your yarn tails using a yarn needle. Go back and forth multiple times through different stitches.
* **Skipping the “Back Loop Only” Round:** That round where you crochet in the back loop only is crucial for creating that upward turn and defining the cauldron shape. Skipping it will result in a flatter, less cauldron-like coaster.
* **Over-Increasing:** While increases are necessary for the base, adding too many rounds of increases can make your coaster too wide and unwieldy. Refer back to your desired diameter and drinkware size.
* **Using the Wrong Yarn:** While you *can* use any yarn, very fuzzy or delicate yarns might not hold up well to repeated use and washing. Sticking to durable materials like acrylic or cotton is usually best for coasters.
Creating your own crochet cauldron coasters is a rewarding and practical project. They add a touch of handmade charm to your home, protect your furniture, and are a delightful reminder that a little bit of crafting magic can go a long way in making your living space feel truly yours. Happy crocheting!
Conclusion
These Crochet Cauldron Coasters aren’t just adorable – they bring a touch of handmade charm and practical protection to your everyday spaces. Imagine your coffee table, finally safe from condensation rings, all while looking delightfully whimsical!
Ready to start? Your smallest first step is simply grabbing your crochet hook and a scrap of black yarn. You can have your very first cauldron coaster finished in under an hour!
If you’re looking for a different vibe, try using jewel tones for a sophisticated living room, or a miniature size in bright colors for a child’s play area.
We hope this project sparks joy and inspires you to create more! Feel free to explore our site for even more delightful home decor and organization ideas.