DIY Light-Up Halloween Witches: Pottery Barn Ideas
How To Make Light-Up Halloween Witches, inspired by Pottery Barn’s charming designs, is the perfect solution for that empty, slightly spooky corner of your home. Are you tired of your Halloween decor feeling a little… uninspired? Does your entryway lack that magical, welcoming touch as October rolls in? Imagine your porch or living room illuminated by these delightful, glowing witches, casting a warm, inviting (yet still playfully eerie!) light. With just a few simple supplies, you can create these enchanting figures in under an afternoon, for likely under $30. In this guide, I’ll walk you through exactly how to craft these whimsical witches, from gathering your materials to adding those final, sparkling touches. Get ready to transform your home into a Halloween wonderland!
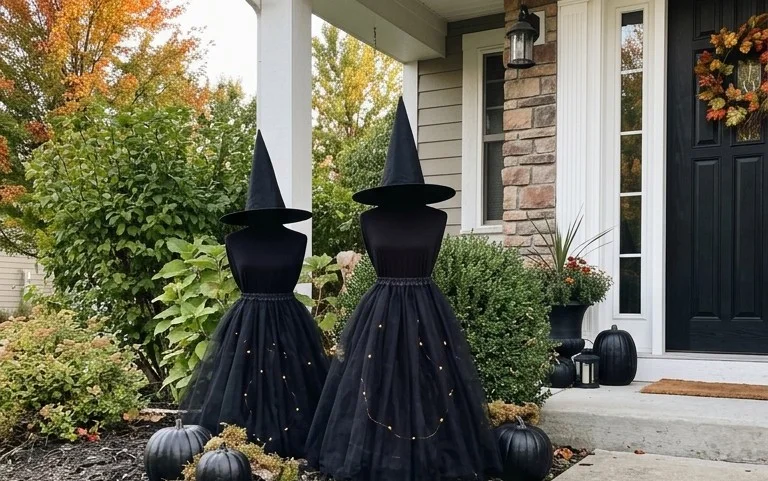
Craft Your Own Enchanted Entrance: Pottery Barn-Inspired Light-Up Halloween Witches
There’s something truly magical about Halloween. The crisp air, the rustling leaves, and the thrill of a well-placed spooky decoration. If you, like me, have admired those sophisticated, witchy silhouettes that grace the pages of Pottery Barn (and their accompanying price tags!), you might have thought, “I could do that!” Well, you absolutely can. Today, I’m going to guide you through creating your very own light-up Halloween witches, inspired by that iconic look, but with a DIY twist that’s both budget-friendly and incredibly rewarding. Forget the flimsy store-bought options; these will add a touch of handcrafted elegance to your Halloween decor.
Gathering Your Covens’ Supplies: What You’ll Need (and What it Might Cost)
This project is surprisingly accessible. We’ll be working with materials that are readily available at craft stores, hardware stores, and even some large retailers.
Here’s what you’ll need:
- Black Plastic Tablecloths: Aim for at least 2-3 large ones (around 54 inches x 108 inches). These will form the bulk of our witch’s fabric. (Estimated Cost: $5 – $10)
- Cardboard: You’ll need a few sturdy pieces. Large appliance boxes are perfect, but even multiple smaller boxes taped together will work. Check local appliance stores or grocery stores for free options. (Estimated Cost: Free – $5)
- Chicken Wire or Floral Wire Mesh: This will give our witches their structure. A roll about 2 feet wide and 10 feet long should be plenty. (Estimated Cost: $15 – $25)
- Heavy-Duty Tape: Duct tape or packing tape are your best friends here. You’ll need a good amount. (Estimated Cost: $5 – $10)
- Wire Cutters/Tin Snips: Essential for shaping the chicken wire. (Estimated Cost: $10 – $20 if you don’t already own some)
- Scissors or a Craft Knife: For cutting cardboard and fabric. (Estimated Cost: Basic scissors are likely already in your home)
- Hot Glue Gun and Glue Sticks: For securing fabric and smaller details. (Estimated Cost: $10 – $15 for a gun and a pack of sticks)
- LED String Lights: Battery-operated fairy lights or string lights are ideal. Choose a warm white or spooky orange for a magical glow. You’ll likely need 2-3 strings per witch. (Estimated Cost: $15 – $30 for multiple strings)
- Optional: Black Spray Paint: To give your witches a more uniform, finished look before adding fabric. (Estimated Cost: $5 – $10)
- Optional: Craft Fabric Scraps or Felt: For adding details like belts, buckles, or patches. (Estimated Cost: $3 – $7)
- Optional: Stiff Wire or Coat Hangers: For creating more defined hat shapes. (Estimated Cost: Free – $5)
The total estimated cost for creating 2-3 witches, depending on what you already have on hand and whether you opt for optional items, could range from approximately $68 to $145. This is a fraction of the cost of purchasing comparable decor from a high-end retailer.
Measuring Up for Mystical Magnitude: Planning Your Project
Before you dive in with scissors and glue, a little planning goes a long way. Think about where you want your witches to stand. Are they flanking your front door, peeking from behind a bush, or greeting guests in your entryway? This will dictate their size.
I like to envision my witches standing about 5-6 feet tall. This gives them a commanding presence without being overwhelmingly large. For this height, you’ll want your base structure to be roughly 4-5 feet tall before adding the hat.
Here’s a simple measurement guide:
- Body Height: Aim for 4 to 5 feet for the main body structure.
- Hat Height: Plan for an additional 18 to 24 inches for the conical hat.
- Width: The chicken wire structure should be about 1.5 to 2 feet wide at its widest point (the shoulders) and taper down to a narrower base.
Consider the space you have. If you’re working with a smaller apartment or a rental, you might want to scale down your witches to 3-4 feet tall. This will make them easier to store and manage. For rentals where drilling isn’t an option, we’ll discuss some clever alternatives later.
The Spellbinding Sequence: A Step-by-Step Guide
Let’s get down to business and bring these spooky figures to life!
- Construct the Frame:
- Cut a piece of chicken wire roughly 4-5 feet long and 2 feet wide.
- Form this into a cone or cylinder shape, tapering it slightly towards the bottom. You’re aiming for a basic witchy silhouette. Secure the edges firmly with duct tape.
- You can create a more defined shoulder by gently pushing in the top edges of the wire.
- If you want a more substantial frame, you can tape cardboard pieces to the inside or outside of the chicken wire for added rigidity.
- Build the Hat Structure:
- Cut a large circle from your cardboard, about 18-24 inches in diameter. This will be the brim of the hat.
- Cut a long, wide triangle from cardboard (or tape multiple pieces together) for the cone of the hat. The base of the triangle should be slightly smaller than the circumference of your cardboard circle. Roll this into a cone and secure it with tape.
- For extra stability and shape, you can insert a piece of stiff wire or a straightened coat hanger around the edge of the brim and the base of the cone.
- Attach the cone to the brim using plenty of tape.
- Shape the Witch’s Body:
- If you haven’t already, attach your hat structure to the top of your chicken wire body using duct tape. You might need to create a small cardboard collar to help the hat sit securely.
- Now, start draping the black plastic tablecloths over your frame. You want to create a flowing, witchy look. Don’t worry about perfection; wrinkles and folds add character.
- Drape the fabric so it covers the chicken wire, creating sleeves and the illusion of a body. You can secure the fabric with small pieces of tape as you go.
- For the bottom of the witch, let the fabric trail to the ground, giving it that classic sweeping witch look.
- Add the Fabric Layers and Texture:
- Once you have your base fabric draped, you can add more layers for depth and texture. Cut strips of tablecloth and loosely tie or drape them around the “waist” and shoulders. This creates a fuller, more dynamic look.
- You can also crinkle and tear the edges of some of the fabric strips for a more tattered, spooky effect.
- Secure and Refine:
- Use your hot glue gun to secure any loose fabric edges or to attach fabric details. This is where you can add a simple belt made from a strip of contrasting fabric or felt, or even a large button or buckle.
- If you opted for spray paint, now would be the time to give your cardboard hat and any visible cardboard accents a quick coat of black paint for a more cohesive look. Let it dry completely before proceeding.
- Light Up Your Creation:
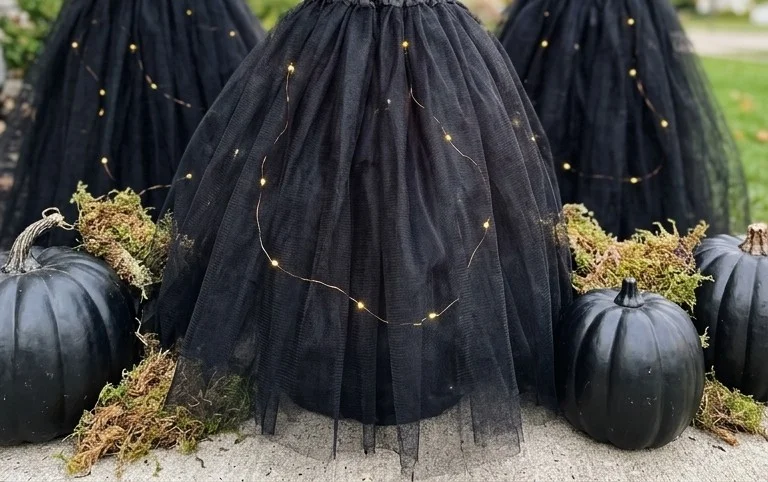
- Carefully tuck your LED string lights inside the witch’s form. Drape them around the chicken wire structure and through the fabric. The goal is to create a soft, ethereal glow that emanates from within.
- Make sure the battery packs are accessible for easy on/off switching and battery replacement. You can often tuck them inside the fabric folds or discreetly at the back.
Adapting for Smaller Spaces and Rental Havens
Worried about space or landlord restrictions? No problem!
- Scale Down: As mentioned, a 3-4 foot witch is perfectly charming. You can use smaller cardboard boxes for the base and less chicken wire.
- No Drilling, No Problem: For rental properties, avoid any permanent attachments. The beauty of this project is that it’s largely held together with tape and glue.
- Freestanding Wonders: Ensure your witches are stable on their own. If they seem a bit wobbly, you can tape some small weights (like rocks or bags of sand) to the inside base of the chicken wire frame.
- Portable Magic: These witches are relatively lightweight once constructed, making them easy to move and store.
Styling Notes for Enchanting Ambiance
The magic of these witches isn’t just in their light; it’s in how they’re styled.
- Colour Palette: Stick to a sophisticated black and grey palette for that classic Pottery Barn vibe. You can introduce pops of deep purple, emerald green, or burnt orange through smaller accent elements like fabric scraps or even strategically placed pumpkins.
- Texture Play: Contrast the smooth plastic tablecloths with rougher textures. Consider adding a burlap ribbon around the waist, or tucking in dried leaves or faux cobwebs around the base.
- Strategic Placement:
- Entryway: Place one on each side of your front door for a dramatic welcome.
- Porch/Patio: Line a walkway or place them near seating areas.
- Indoor Corners: A single witch can add a touch of spooky elegance to an empty corner of a living room or hallway.
- Accompanying Decor: Keep the rest of your decor relatively simple to let the witches shine. Think black lanterns, mini pumpkins, or a few scattered faux spiders. Don’t overcrowd the scene.
- The Glow Factor: The warm LED lights should create a soft, inviting glow. If the light seems too harsh, you can diffuse it further by draping a thinner layer of fabric over the lights.
Maintaining the Magic: Keeping it Tidy After Week One
Once the initial Halloween week is over and you’ve admired your handiwork, you’ll want to keep your witches looking their best.
- Dust Patrol: A quick dusting with a feather duster or a dry cloth is usually all that’s needed. The fabric can hold dust, so regular, light cleaning will prevent buildup.
- Fabric Adjustments: If any fabric has shifted or come loose, a touch of hot glue or a strategically placed piece of tape can quickly secure it.
- Light Check: Make sure your LED lights are still functioning. Replace batteries as needed.
- Structural Integrity: Give the chicken wire frame a quick once-over to ensure it’s still holding its shape. Minor dents can often be gently reshaped.
Avoiding the Pitfalls: Mistakes That Make This Project Fail
Even the most enchanted projects can have their glitches. Here are a few common mistakes to watch out for:
- Over-Complication: Resist the urge to add too many intricate details. The beauty of these witches is their elegant simplicity. Too many embellishments can make them look cluttered.
- Poor Frame Structure: A flimsy frame will lead to a droopy, sad witch. Ensure your chicken wire is securely taped and that the cardboard hat is well-supported.
- Tight Fabric Draping: Don’t pull the fabric too taut. The magic comes from the flowing, draped look. Let the fabric hang naturally.
- Ignoring the Glow: The lights are crucial! Make sure they are distributed evenly and that they create a visible, magical effect. Too few lights, or lights clustered in one spot, will diminish the impact.
- Forgetting Accessibility: Ensure you can easily access the battery packs for your lights. You don’t want to have to dismantle your witch to change batteries!
- Using Flammable Materials: Always opt for LED lights, as they produce very little heat, making them safe to use with plastic and fabric. Never use incandescent bulbs.
Creating these light-up Halloween witches is a wonderfully rewarding way to infuse your home with spooky spirit. It’s a project that allows for creativity, customization, and a touch of DIY magic. So gather your supplies, embrace your inner crafter, and get ready to enchant your guests with your very own coven of glowing witches!
Conclusion
Adding these delightful light-up Halloween witches can truly transform your home, bringing a touch of whimsical magic that makes every day feel a little more enchanting. Even a single, strategically placed witch can cast a warm glow and a spooky charm, making your Halloween decor a talking point. Ready to start today? Your smallest first step is to gather a few basic craft supplies and sketch out your design – you’ll be surprised how quickly inspiration strikes!
Variations to Consider:
For a different vibe, try creating smaller, more minimalist witches for a bookshelf in your study. On a tighter budget, repurpose old jars and paint them to mimic the Pottery Barn aesthetic for an equally festive, illuminated display.
We hope these ideas inspire you to embrace the spirit of DIY Halloween decor. Explore more of our creative ideas to keep the magic going all season long!